windows 10使用cygwin安装openssh服务端
install-openssh-with-cygwin-on-windows-10
本来windows10上已经有内置的openssh,我可能爱折腾不愿意使用内置的,所以使用cygwin重新安装了一个ssh服务.
安装步骤总结
- 安装cygwin
- 使用管理员权限运行cygwin安装
openssh和openssl - ssh-host-config命令开始配置ssh
- windows10内置的
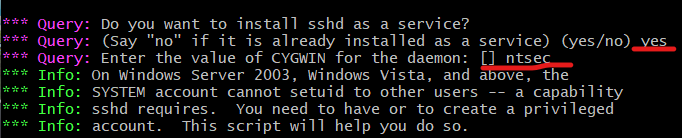
sshd和ssh-host-config默认的服务名冲突解决 - 一系列ssh-host-config配置,包括daemon名称
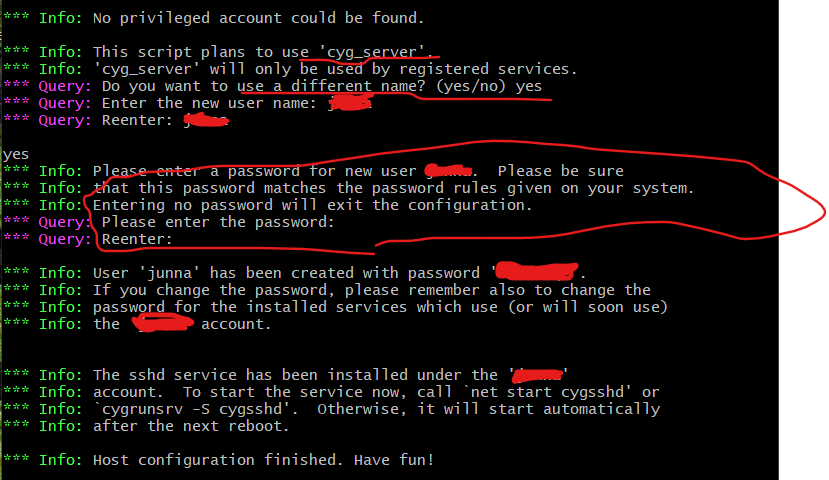
ntsec和创建默认的cyg_server来运行sshd服务 - ssh-user-config生成用户的密钥(非必须,可以使用密码登陆,用户就是windows的正常用户)
- 启动服务
net start cygsshd - 使用putty登陆localhost测试
- 卸载
ssh - 重新安装
ssh
注意:cygwin使用的是windows的用户和权限,所以默认
/etc/下是没用passwd和group等文件的,不要太惊讶。开始我也没用搞明白,而且
ssh-host-config中创建一个cyg_server用户是真实的windows账户,但是需要组策略才能够看到,这个用户用来启动sshd服务的,而且不能用来登陆windows,因为是一个令牌用户,在组策略>计算机配置>windows配置>安全设置>本地策略>用户权限分配> 创建一个令牌对象中看到。
cygwin安装openssh和openssl
假设你已经安装了cygwin,使用cygwin安装openssh和openssl详情看参考:
how-to-get-ssh-command-line-access-to-windows-7-using-cygwin/
修复sshd service is already installed.
警告:sshd service is already installed.
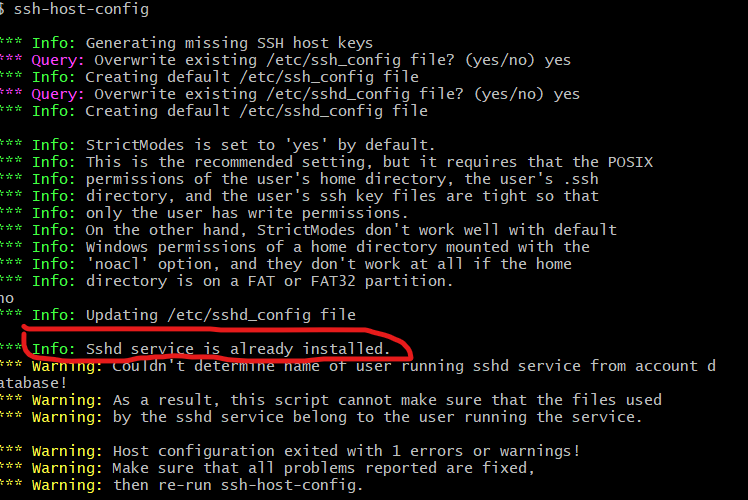
出现sshd service is already installed.的问题是因为windows 10内置了一个openssh,造成了冲突,现在只需要修改cygwin安装的openssh中的默认的sshd服务名称。
修改默认的sshd服务名
路径: C:/cygwin64/bin/sshd-host-config (32位的有所区别,找不到用everything搜索一下啊)
修改: service_name=sshd 为 service_name=cygsshd (cygsshd自定义的)
修改完之后重新执行ssh-host-config,上面的问题解决.
下面是运行中的截图.

建议使用默认的cyg_server,没用必要重新自定义,我当时也是好奇,搞得走了很多弯路。
启动服务
也可以重启一下系统,服务会自动启动
1 | net start cygsshd # cygsshd是自定义的service_name |
ssh-user-config
选择生成用户的
RSA口令就行了,RSA比较常用,其它的不是很常用。
卸载ssh服务
1 | # 删除sshd服务, sshd时默认的服务名,如果你定义了,输入你的服务名 |
重装ssh重新设置权限
如果设置权限不行,删除sshd.log和empty文件夹.
1 |
|
参考资料
Installing Cygwin and Starting the SSH Daemon
how-to-get-ssh-command-line-access-to-windows-7-using-cygwin/
